Heat Shrink Tubing Size Chart
Enter the largest diameter the tube must slide over and the smallest it must grip to find the heat shrink size and ratio that fit.
The Heat Shrink Tubing Size Chart is a free, browser-based tool that tells you which heat shrink tubing size and shrink ratio will slide over a connector and grip a wire. Heat shrink is sold by its expanded inside diameter and recovers to about that size divided by the shrink ratio, and the tool does this calculation for every size in the series.
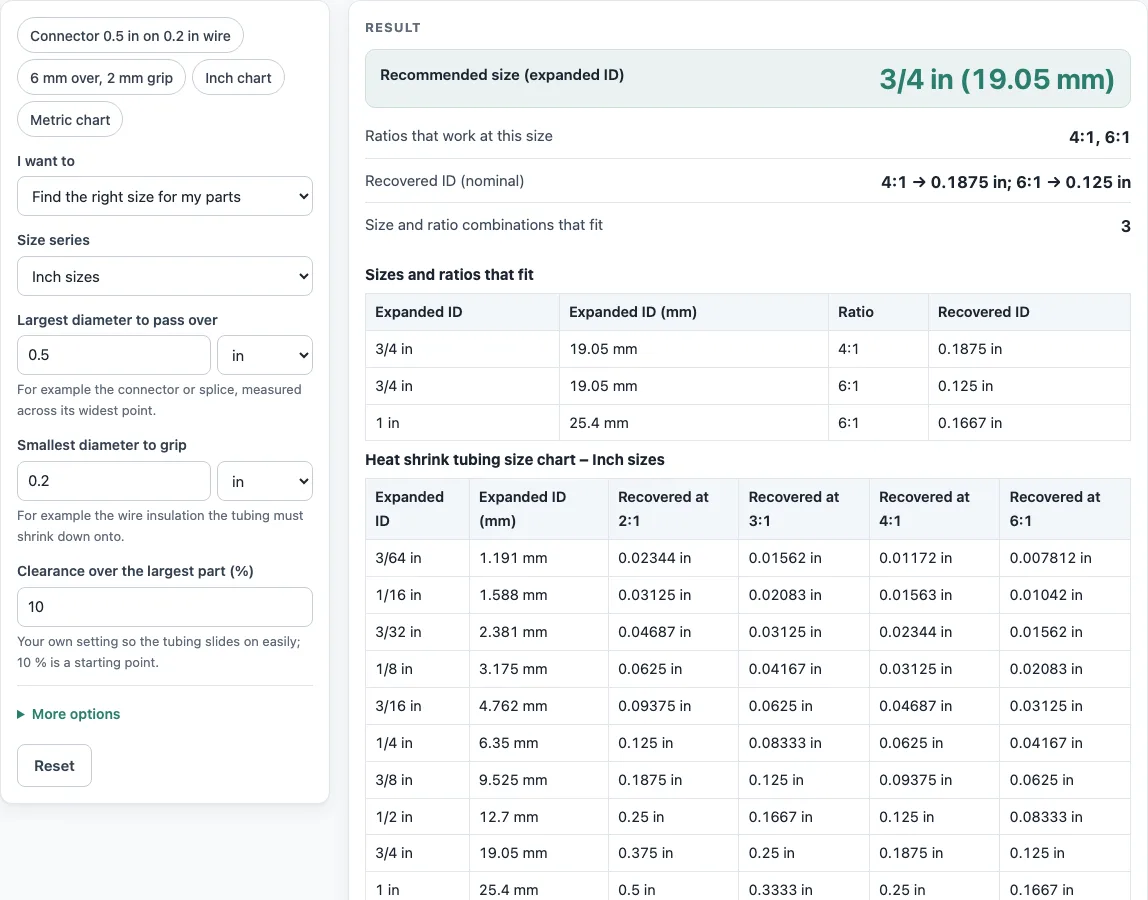
It has two modes. Find mode takes your connector and wire diameters, lists every size and ratio that fits, and recommends the smallest one that works. Chart mode shows the recovered diameters for each size and ratio in a single table, so you can compare options at a glance.
The tool runs in your browser, needs no sign-up, and uploads nothing. It also works on a phone.
How to use the Heat Shrink Tubing Size Chart
- Open the tool and choose Find mode to match a specific connector and wire, or Chart mode to see the full table.
- In Find mode, enter the largest diameter the tubing must slide over, such as a connector.
- Enter the smallest diameter the tubing must grip, such as the wire.
- Set the clearance %. It defaults to 25 %, which is the minimum 20 % shrink that TE’s selection guide asks for. The tool also keeps 10 % of the shrink unused on the smallest part, as TE recommends.
- Read the results. The tool lists every size and ratio that fits and recommends the smallest fitting size.
- Open How it was calculated to see the formula and each step worked out with your numbers.
- In Chart mode, scan the recovered diameters across sizes and ratios to compare options.
Results update as you type, so change a value and watch the list change. Copy result copies the result lines with a link. Copy link copies the page address, which stores every input, so opening it later restores the same calculation. Print / save as PDF prints your inputs, results, calculation steps and the date.
The presets show a 0.5 in connector on a 0.2 in cable, a metric 6 mm over 2 mm case, and the inch and metric charts.
What size heat shrink do I need?
You need the smallest expanded size that meets two conditions. Its expanded inside diameter must be at least the largest connector diameter multiplied by (1 + clearance), and its recovered inside diameter, plus a 10 % margin, must be no bigger than the smallest diameter you need to grip.
The tool applies both checks to every size and ratio. Any option that passes both is listed, and the smallest passing option is recommended.
What does a 2:1 or 3:1 shrink ratio mean?
The shrink ratio is how much smaller the tubing gets when heated. Recovered inside diameter equals expanded inside diameter divided by the ratio. A 3/4 in tube at 4:1 recovers to about 3/16 in, and at 6:1 it recovers to about 1/8 in.
A higher ratio closes a bigger gap between the connector and the wire. A 2:1 ratio is enough when the two are close in size.
How do I measure heat shrink size?
Measure the widest part of the connector or joint that the tube must pass over, and enter that as the largest diameter. Measure the wire or cable, or its insulation if it has one, and enter that as the smallest diameter. Use calipers for the most accurate reading; a ruler works for rough checks.
The tool works with the diameters you enter, so measure the parts that actually touch the tubing.
What heat shrink size for a wire gauge?
The tool works with diameters, not wire gauge numbers. Find the outside diameter of the insulated wire from its datasheet or by measuring it, then enter that value as the smallest diameter.
Tubing sized for the bare conductor will often be too small for insulated wire, so use the overall outside diameter.
Should I use 3:1 or 4:1 heat shrink?
Choose the lower ratio that still fits, because it gives a tighter grip on the wire. Use 4:1 when the connector is much larger than the wire and 3:1 cannot reach the wire’s diameter.
For example, with a 0.5 in connector and a 0.2 in cable at 25 % clearance, 3/4 in tubing at 4:1 recovers to 0.1875 in, which leaves less than 10 % unrecovered on the 0.2 in cable. At 6:1 it recovers to 0.125 in, which works.
Sources
Checked October 2026:
- TE RNF-100 catalogue pages: inch sizes 3/64 to 4 in, their mm values, and recovered diameters printed as maximums
- TE sealed-size tubing selection guide: shrink at least 20 % onto the part and keep at least 10 % unrecovered
- Wikipedia, Heat-shrink tubing for ratios from 2:1 to 6:1; Nelco 3:1 tubing. Not every size is made in every ratio
For estimation; verify critical designs against the applicable standard.
Worked examples
| Input | Result |
|---|---|
| over 0.5 in, grip 0.2 in, 25 % clearance | 3/4 in (19.05 mm), ratio 6:1 |
| over 0.5 in, grip 0.25 in, 0 % clearance | 1/2 in (12.7 mm), ratio 3:1, 4:1, 6:1 |
| over 6 mm, grip 2 mm, 10 % clearance | 9.5 mm (0.374 in), ratio 6:1 |
| over 25.4 mm, grip 6 mm, 0 % clearance | 1 in (25.4 mm), ratio 6:1 |
| Inch sizes | 15 sizes, Inch sizes |
Calculated by the tool above with these values.
Frequently asked questions
Does the tool check wall thickness or temperature rating?
No. The tool does not cover wall thickness or temperature ratings. Check the maker’s datasheet for those values.
Does the tool handle adhesive-lined heat shrink?
No. Adhesive-lined tubing is not covered, so check its datasheet before you choose a size.
Are the recovered sizes exact?
The sizes shown are nominal. Datasheets give the maximum recovered inside diameter, so use that figure for tight fits.
Can I use the results in a quote or job sheet?
Yes. Results may be used in commercial work such as quotes, price lists, job sheets and reports, without attribution.
How much clearance should I leave?
The default is 25 % over the largest diameter, so the tube shrinks at least 20 % onto it, as TE’s heat shrink selection guide recommends. Lower it only if your tubing maker allows a tighter fit.
Can I use metric sizes?
Yes. Choose the metric series (1.2 to 101.6 mm, the mm sizes TE prints) and enter diameters in mm.
How much does heat shrink tubing shrink in length?
Tubing also shortens a little lengthwise when it recovers; the amount is given on the maker’s datasheet, so cut a little longer than the joint.
Can I see all sizes at once?
Yes. Choose the chart option to see every size in the series with its recovered diameter at 2:1, 3:1, 4:1 and 6:1.
Related tools
- Mil to mm converter: Use it when a thickness is given in mils and you need millimetres.
- Plastic density chart: Use it to look up the density of common plastics.
- Plastic weight calculator: Use it to estimate the weight of a plastic part from its size and material.
- Recycling symbols chart: Use it to identify the resin codes printed on plastic products.
- O-ring size chart: use it to find an AS568 O-ring by inside diameter and cross-section.
- Grommet size chart: use it to pick a grommet for a cable or rope diameter.
- All calculators: Use it to browse every tool on the site.